This is a remix of the Adafruit PyPortal Weather Station, customized for MCC-US 1029
First and foremost: you need an API key from OpenWeather to use this tutorial. It may take some time to get, so go here and sign up for one: https://home.openweathermap.org/
API, or Application Programming Interface, is a way to easily get information. In this case, we’re getting our local weather from the OpenWeather platform and we’re also getting the time from Adafruit IO, so we’ll be using two API keys. The Adafruit IO we already have, and while we’re waiting for the OpenWeather one we’ll go on to set up the PyPortal.
Now we make sure we have CircuitPython 9 updated. Start by confirming which device you have – the standard PyPortal (no external sensor) or a PyPortal Pynt (has an external temperature sensor attached.) It matters just for the first step here.
If you have the standard PyPortal – download the most recent release of CircuitPython for the Standard Portal (a uf2 file), plug in your board, double-click the resent button to put it in “bootloader mode”, and then drag the .uf2 file to the PORTALBOOT drive. Your drive should reset and reappear as CIRCUITPY.
If you have the PyPortal Pynt – download the most recent release of CircuitPython for the Pynt (a uf2 file), plug in your board, double-click the resent button to put it in “bootloader mode”, and then drag the .uf2 file to the PORTALBOOT drive. Your drive should reset and reappear as CIRCUITPY.
From here on the steps are the same for both devices!
Update libraries: Make sure you update the libraries on the CIRCUITPY board – WE NEED A LOT OF THEM – download the OpenWeatherLibraries.zip file here, (or you can manually load libraries from wherever you downloaded your library folder) until the lib folder on CIRCUITPY looks like this:

Now, we’re going to run a test to make sure that your portal can get on the internet. Up until now, we’ve been using the secrets.py file (hi friend!). We’re going to try adding a settings.toml file as well. Go back to our shared class Google Drive, and download the sample settings.toml file (and the secrets.py file too, if you don’t have one!). Put the file on your CIRCUITPY drive, and then open it using a text editor. You’ll see the class SSID and passkey for the internet, and then a space for your Adafruit username and key. Grab those from https://io.adafruit.com/ (press the big yellow button with the key on it!) You’ll also see a space for the OpenWeather token, we’re not putting that in yet (right now it’s got one that will work in a pinch).
Now save the settings.toml file. You’ll get some error messages because your computer doesn’t like saving files on the CIRCUITPY drive, just save it anyway.
Ok, now time for internet connect. Open up the Mu editor, press Load and load your code.py file, delete everything in it, and replace it with this code (it’s the Internet Connect! code from Adafruit)
# SPDX-FileCopyrightText: 2019 ladyada for Adafruit Industries
# SPDX-License-Identifier: MIT

from os import getenv
import board
import busio
from digitalio import DigitalInOut
import adafruit_connection_manager
import adafruit_requests
from adafruit_esp32spi import adafruit_esp32spi

# Get wifi details and more from a settings.toml file
# tokens used by this Demo: CIRCUITPY_WIFI_SSID, CIRCUITPY_WIFI_PASSWORD
secrets = {
    "ssid": getenv("CIRCUITPY_WIFI_SSID"),
    "password": getenv("CIRCUITPY_WIFI_PASSWORD"),
}
if secrets == {"ssid": None, "password": None}:
    try:
        # Fallback on secrets.py until depreciation is over and option is removed
        from secrets import secrets
    except ImportError:
        print("WiFi secrets are kept in settings.toml, please add them there!")
        raise

print("ESP32 SPI webclient test")

TEXT_URL = "http://wifitest.adafruit.com/testwifi/index.html"
JSON_URL = "http://api.coindesk.com/v1/bpi/currentprice/USD.json"


# If you are using a board with pre-defined ESP32 Pins:
esp32_cs = DigitalInOut(board.ESP_CS)
esp32_ready = DigitalInOut(board.ESP_BUSY)
esp32_reset = DigitalInOut(board.ESP_RESET)

# If you have an AirLift Shield:
# esp32_cs = DigitalInOut(board.D10)
# esp32_ready = DigitalInOut(board.D7)
# esp32_reset = DigitalInOut(board.D5)

# If you have an AirLift Featherwing or ItsyBitsy Airlift:
# esp32_cs = DigitalInOut(board.D13)
# esp32_ready = DigitalInOut(board.D11)
# esp32_reset = DigitalInOut(board.D12)

# If you have an externally connected ESP32:
# NOTE: You may need to change the pins to reflect your wiring
# esp32_cs = DigitalInOut(board.D9)
# esp32_ready = DigitalInOut(board.D10)
# esp32_reset = DigitalInOut(board.D5)

# Secondary (SCK1) SPI used to connect to WiFi board on Arduino Nano Connect RP2040
if "SCK1" in dir(board):
    spi = busio.SPI(board.SCK1, board.MOSI1, board.MISO1)
else:
    spi = busio.SPI(board.SCK, board.MOSI, board.MISO)
esp = adafruit_esp32spi.ESP_SPIcontrol(spi, esp32_cs, esp32_ready, esp32_reset)

pool = adafruit_connection_manager.get_radio_socketpool(esp)
ssl_context = adafruit_connection_manager.get_radio_ssl_context(esp)
requests = adafruit_requests.Session(pool, ssl_context)

if esp.status == adafruit_esp32spi.WL_IDLE_STATUS:
    print("ESP32 found and in idle mode")
print("Firmware vers.", esp.firmware_version)
print("MAC addr:", ":".join("%02X" % byte for byte in esp.MAC_address))

for ap in esp.scan_networks():
    print("\t%-23s RSSI: %d" % (ap.ssid, ap.rssi))

print("Connecting to AP...")
while not esp.is_connected:
    try:
        esp.connect_AP(secrets["ssid"], secrets["password"])
    except OSError as e:
        print("could not connect to AP, retrying: ", e)
        continue
print("Connected to", esp.ap_info.ssid, "\tRSSI:", esp.ap_info.rssi)
print("My IP address is", esp.ipv4_address)
print(
    "IP lookup adafruit.com: %s" % esp.pretty_ip(esp.get_host_by_name("adafruit.com"))
)
print("Ping google.com: %d ms" % esp.ping("google.com"))

# esp._debug = True
print("Fetching text from", TEXT_URL)
r = requests.get(TEXT_URL)
print("-" * 40)
print(r.text)
print("-" * 40)
r.close()

print()
print("Fetching json from", JSON_URL)
r = requests.get(JSON_URL)
print("-" * 40)
print(r.json())
print("-" * 40)
r.close()

print("Done!")
Press save to run it, and wait until you see the word Done! pop up.
Now Quit Mu! We’ll return to it later but it’s easier if it isn’t running for a bit.
This weather display uses bitmap fonts like our little data logger did, but it also uses images as well – so you’re going to need to copy a bunch of stuff onto your little drive. Go back to our shared class folder and grab PyPortal Weather files.zip. Download it and unpack it – it’s going to give you all of the “extra” stuff you need on your CIRCUITPY drive. It should look like this:
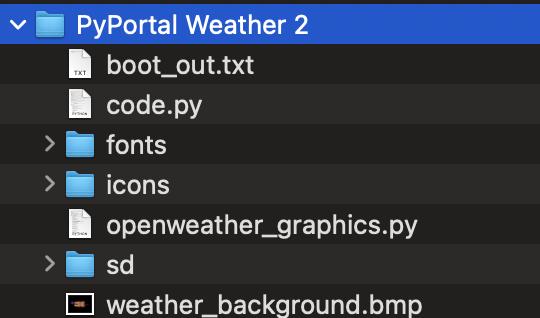
Copy all of these to the CIRCUITPY drive. You may need to merge the fonts folder with the one you have. You also will be replacing the code.py file with the one you just downloaded.
Final check- your CIRCUITPY drive should look like this:

Then you can look inside the folders and see these items:
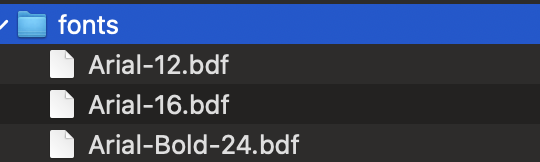


The SD folder just has a placeholder in it, so you don’t have to worry about that one.
And the last setup piece is to 0pen up your secrets.py file (you can do this in the Mu editor or in a text editor) and add a line to it like so:
'openweather_token' :
And now, our final piece: the API! We need to put it in this file, after the colon. Go and check your email and see if they have sent you an API key. It may say something like “it will be ready to use in a few hours,” don’t worry, we’re just going to give it a try now. The API key is a long string of numbers and lowercase letters, something like “ghn4679bndh6739g7snjgogy”. Cut and paste it right into the secrets.py file.
