pyportal Draw Shapes
This is an exploration of CircuitPython Display Shapes with a remix of the Adafruit IoT Data Logger, customized for MCC-US 1029
Step 1: Start by confirming which device you have – the standard PyPortal (no external sensor) or a PyPortal Pynt (has an external temperature sensor attached.) It matters just for the first step here.
If you have the standard PyPortal – download the most recent release of CircuitPython (a uf2 file), plug in your board, double-click the resent button to put it in “bootloader mode”, and then drag the .uf2 file to the PORTALBOOT drive. Your drive should reset and reappear as CIRCUITPY.
If you have the PyPortal Pynt – download the most recent release of CircuitPython (a uf2 file), plug in your board, double-click the resent button to put it in “bootloader mode”, and then drag the .uf2 file to the PORTALBOOT drive. Your drive should reset and reappear as CIRCUITPY.
From here on the steps are the same for both devices!
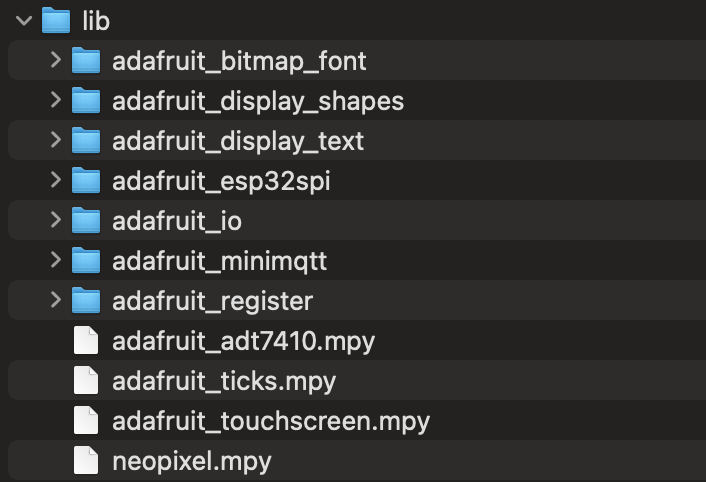
Step 2: Make sure you update the libraries on the CIRCUITPY board – download the DisplayShapesLibraries.zip file here, or you can manually libraries from wherever you downloaded your library folder until the lib folder on CIRCUITPY looks like this:
Step 3: Double check that your secrets.py file has the correct wifi name, wifi password, as well as your Adafruit IO username and key. (You can sign up or log in at that link, and then once you are logged in, the key is found by clicking the big yellow circle with the black key icon in it).
Step 4: Set up your Dashboard on Adafruit IO to have a light block, a temperature block, a Status Indicator Block, and then two line graphs- one for Light and one for Temperature. You can follow the directions on the Adafruit site if you haven’t done this yet. Your dash should look like this:

Step 5: Open Mu and load the Pyportal code file. If you don’t have the Mu editor, grab it from codewith.mu. Open it up and make sure it’s in the right mode (click the Mode button in the upper left and select CircuitPython.) And then load your code.py file from your CIRCUITPY drive. Make sure ALL of the code you work with below is always, always named code.py.
Drawing Shapes
Today, we’re going to learn how to make the display look a little nicer. We’ll start with some simple shapes. Go ahead and delete all the code in code.py and replace it with this:
# SPDX-FileCopyrightText: 2021 ladyada for Adafruit Industries
# SPDX-License-Identifier: MIT

import board
import displayio
from adafruit_display_shapes.rect import Rect

# Make the display context
splash = displayio.Group()
board.DISPLAY.root_group = splash

# Make a background color fill
color_bitmap = displayio.Bitmap(320, 240, 1)
color_palette = displayio.Palette(1)
color_palette[0] = 0xFFFFFF
bg_sprite = displayio.TileGrid(color_bitmap, x=0, y=0, pixel_shader=color_palette)
splash.append(bg_sprite)
##########################################################################

rect = Rect(80, 20, 41, 41, fill=0x0)
splash.append(rect)

while True:
    pass
Making display.io work is a little complicated, but essentially, we’re just setting a background color bitmap and then drawing a rectangle on it, using the function splash.append to make each appear. You’ll notice that all of the hard work is done outside of the while True loop.
Now, let’s modify some stuff. Let’s start with changing the background color. It’s a Hex code, in line 15 (currently set to FFFFFF, or white). You can change it to anything you like – use the htmlcolorcodes site or look for your own on the internet. So lets say I want a nice blue color, say 3399FF. I’ll change line 15 to:
color_palette[0] = 0x3399ffNote that I kept the 0x prefix! Now just save the code to reload it, and poof, your color is the background color.
Next, we’ll change the location of the rectangle. Go farther down, and you can see that the function Rect() takes five arguments – those are the x, y coordinates of the top left corner and the width and height (in pixels). It then has its own splash.append. Start by changing the last two numbers in the Rect parentheses – you can use any number larger than 1 but you’ll notice that if it is too big (wider than 250 or higher than 200) it will go off the screen. I’m going to go ahead with 100 and 75:
rect = Rect(80, 20, 100, 75, fill=0x0)
splash.apppend(rect)
And I’m going to change the color to a nice pink, say, ff33f0:
rect = Rect(80, 20, 100, 75, fill=0xff33f0)
splash.append(rect)
Save the code to run it!
You can add a second rectangle, but we’ll want it to be in a different place, so first we’ll add a new name for our second rectangle (I used rect2), and we’ll give it new coordinates and a new color, and then we’ll use splash.append to make it show up. We’re adding a section of code under the code we were just running. Here’s mine, lined up with the original rectangle (so the x coordinate is the same, the y is bigger, the width and height are the same, and I’ve chosen a nice green hex code for the color):
rect = Rect(80, 20, 100, 75, fill=0xff33f0)
splash.append(rect)
rect2 = Rect(80, 120, 100, 75, fill=0x33ff4f)
splash.append(rect2)
Finally, surprise, we can actually add a new argument to give our shape an outline, so I’m going to give it a red outline (hex code is ff4f33) as the sixth argument:
rect = Rect(80, 20, 100, 75, fill=0xff33f0)
splash.append(rect)
rect2 = Rect(80, 120, 100, 75, fill=0x33ff4f, outline=0xff4f33)
splash.append(rect2)
Save and you’re good to go!
What if you want to move beyond rectangles? This library has several built in shapes in addition to a rectangle: a circle, a triangle, and a round rectangle. Let’s try roundrect and circle next. First, delete the rectangle code!
Now, you’ll need to import those functions from display shape, so add these lines to your list of imports:
from adafruit_display_shapes.circle import Circle
from adafruit_display_shapes.roundrect import RoundRect
And then we’ll go down to where the rectangle code was to add the circle, which takes five arguments: the x,y position of the center, the radius (in pixels), and then the fill and outline colors – which are optional, but fun so we’ll keep them. And then, remember to add splash.append! Also, in case you didn’t erase it already, this code is replacing the rectangle code we had earlier, otherwise your display is gonna be crowded:
circ = Circle(80, 80, 50, fill=0xff33f0)
splash.append(circ)
And now we add the roundrect code. It takes seven arguments: the x and y position of the upper left corner, the height and width (in pixels, the radius of the corner quarter-circles (in pixels), the fill and the outline (as hex codes.) Here’s how I am doing it for a yellow shape with a black outline:
roundrect = RoundRect(150, 100, 78, 95, 10, fill=0xf6ff33, outline=0x000000)
splash.append(roundrect)
And you’ve got a circle and a rounded rectangle on your screen. Now, remember before I said that these took some optional arguments, like fill and outline? They actually take one more: stroke, which is the thickness of the outline. You can add a number between 1-15 or so to either shape to make a thick outline. Here’s it on both:
circ = Circle(80, 80, 50, fill=0xff33f0, outline=0x7a33ff, stroke=6)
splash.append(circ)
roundrect = RoundRect(150, 100, 78, 95, 10, fill=0xf6ff33, outline=0x000000, stroke=3)
splash.append(roundrect)
We can also draw lines and polygons, see more information here if you’re interested.
Displaying Fonts
Shapes are great, but what if we wanted to use our display to say something? For that, we’re going to use bitmap fonts. But before we do, we need to actually get some. Download the .zip file from here, unpack it, and put it on your CIRCUITPY drive so that it looks like this:

Ok, fonts loaded. Let’s start by giving ourselves a nice background and maybe a little shape, like a circle in the middle. Modify your code from before so it looks like this. You can change any of the colors here if you want, by default it’s a pink circle with a purple outline on a blue background:
# Make the display context
splash = displayio.Group()
board.DISPLAY.root_group = splash

# Make a background color fill
color_bitmap = displayio.Bitmap(320, 240, 1)
color_palette = displayio.Palette(1)
color_palette[0] = 0x3399ff
bg_sprite = displayio.TileGrid(color_bitmap, x=0, y=0, pixel_shader=color_palette)
splash.append(bg_sprite)

# Make a circle on it too
circ = Circle(160, 120, 100, fill=0xff33f0, outline=0x7a33ff, stroke=6)
splash.append(circ)
Now, to pull in fonts we’ll need new libraries. Add these to your import list:
from adafruit_display_text import label
from adafruit_bitmap_font import bitmap_font
Ok, now we’re ready to do some new code. At the bottom of your code, but BEFORE the while True loop, add the following. It’s a lot!
# Set the font. try uncommenting different files but only one at a time!
# font_file = "fonts/cubic-75.bdf"
font_file = "fonts/Arial-12.bdf"
# font_file = "fonts/Arial-16.bdf"
# font_file = "fonts/Arial-Bold-24.bdf"
# font_file = "fonts/Helvetica-Bold-16.bdf"
# font_file = "fonts/Helvetica-Bold-24.bdf"
# font_file = "fonts/Helvetica-Bold-44.bdf"

# now load the font file
font = bitmap_font.load_font(font_file)

# Set text here to make your life easier
text = "hello"

# Create the text label
text_area = label.Label(font=font, text=text, color=0xFFFFFF)

# Set the location
text_area.x = 80
text_area.y = 80

# show it
splash.append(text_area)
What’s going on here? Well, we need to load a whole font, which is actually already on the PyPortal (remember we added it with the libraries earlier), then we create a little shape called “text_area”, which is a type of special shape called a label, which is a text box! We tell the code what font to use, what text to use, and what color. Right now it’s just white (FFFFFF) but you can change that. The label has a location on the screen set by text_area x and text_area y. And then we use our friend splash.append to show it on the screen.
Go ahead and save it to run it! If there are errors, check that your whole code looks like this:
import board
import displayio
from adafruit_display_shapes.circle import Circle
from adafruit_display_text import label
from adafruit_bitmap_font import bitmap_font

# Make the display context
splash = displayio.Group()
board.DISPLAY.root_group = splash

# Make a background color fill
color_bitmap = displayio.Bitmap(320, 240, 1)
color_palette = displayio.Palette(1)
color_palette[0] = 0x3399ff
bg_sprite = displayio.TileGrid(color_bitmap, x=0, y=0, pixel_shader=color_palette)
splash.append(bg_sprite)

# Make a circle on it too
circ = Circle(160, 120, 100, fill=0xff33f0, outline=0x7a33ff, stroke=6)
splash.append(circ)

# Set the font. try uncommenting different files but only one at a time!
# font_file = "fonts/cubic-75.bdf"
font_file = "fonts/Arial-12.bdf"
# font_file = "fonts/Arial-16.bdf"
# font_file = "fonts/Arial-Bold-24.bdf"
# font_file = "fonts/Helvetica-Bold-16.bdf"
# font_file = "fonts/Helvetica-Bold-24.bdf"
# font_file = "fonts/Helvetica-Bold-44.bdf"

# now load the font file
font = bitmap_font.load_font(font_file)

# Set text here to make your life easier
text = "hello"

# Create the text label
text_area = label.Label(font=font, text=text, color=0xFFFFFF)

# Set the location
text_area.x = 80
text_area.y = 80

# show it
splash.append(text_area)

while True:
    pass
You can mess around with this all you want – you can use the # symbol to comment/uncomment lines 23-29 to change the font (please only use one at a time!), change the text in line 35, and move the font around with text_area.x and .y. Try and find a font that will fit in the circle, and then try and get it centered!
Great work! You can download more bitmap fonts and try to figure out how to load them if you want. You can read more about how bitmap fonts work on the Adafruit website.
A countdown clock
Now, what if we combined our code from this week with last week? Remember we had a data logger that had a countdown on the screen? Here’s some code that uses labels and fonts to make a nicer clock. Cut and paste it into code.py (replacing your code) to give it a try. See if you can figure out what it is doing!
"""
PyPortal IOT Data Logger With Touchscreen and Countdown Clock Picture
"""
import time
import board
import busio
import adafruit_touchscreen
import displayio
from adafruit_bitmap_font import bitmap_font
from adafruit_display_text import label
from digitalio import DigitalInOut
from analogio import AnalogIn
from adafruit_esp32spi import adafruit_esp32spi, adafruit_esp32spi_wifimanager
import neopixel
from adafruit_io.adafruit_io import IO_HTTP, AdafruitIO_RequestError
import adafruit_adt7410
from adafruit_display_shapes.roundrect import RoundRect

# set delay length for timer
iotimer = 30  # this is the length of the delay between data uploads, in seconds

# Get wifi details and more from a secrets.py file
try:
    from secrets import secrets
except ImportError:
    print("WiFi secrets are kept in secrets.py, please add them there!")
    raise

# PyPortal ESP32 Setup
esp32_cs = DigitalInOut(board.ESP_CS)
esp32_ready = DigitalInOut(board.ESP_BUSY)
esp32_reset = DigitalInOut(board.ESP_RESET)
spi = busio.SPI(board.SCK, board.MOSI, board.MISO)
esp = adafruit_esp32spi.ESP_SPIcontrol(spi, esp32_cs, esp32_ready, esp32_reset)
status_light = neopixel.NeoPixel(board.NEOPIXEL, 1, brightness=0.2)
wifi = adafruit_esp32spi_wifimanager.ESPSPI_WiFiManager(esp, secrets, status_light)

# Set your Adafruit IO Username and Key in secrets.py
# (visit io.adafruit.com if you need to create an account,
# or if you need your Adafruit IO key.)
ADAFRUIT_IO_USER = secrets['aio_username']
ADAFRUIT_IO_KEY = secrets['aio_key']

# Create an instance of the Adafruit IO HTTP client
io = IO_HTTP(ADAFRUIT_IO_USER, ADAFRUIT_IO_KEY, wifi)

try:
    # Get the 'temperature' feed from Adafruit IO
    temperature_feed = io.get_feed('temperature')
    light_feed = io.get_feed('light')
except AdafruitIO_RequestError:
    # If no 'temperature' feed exists, create one
    temperature_feed = io.create_new_feed('temperature')
    light_feed = io.create_new_feed('light')

# Set up ADT7410 sensor
i2c_bus = busio.I2C(board.SCL, board.SDA)
adt = adafruit_adt7410.ADT7410(i2c_bus, address=0x48)
adt.high_resolution = True

# Set up an analog light sensor on the PyPortal
adc = AnalogIn(board.LIGHT)

# Set up Touchscreen
display = board.DISPLAY
ts = adafruit_touchscreen.Touchscreen(
    board.TOUCH_XL,
    board.TOUCH_XR,
    board.TOUCH_YD,
    board.TOUCH_YU,
    calibration=((5200, 59000), (5800, 57000)),
    size=(320, 240),
)

# _______adding a countdown clock_______

# set up our board area
splash = displayio.Group()
board.DISPLAY.root_group = splash

# Set the font and preload letters
font_large = bitmap_font.load_font("/fonts/DS-Digital-Bold-104.bdf")
font_large.load_glyphs(b'1234567890')
font_small = bitmap_font.load_font("/fonts/Helvetica-Bold-44.bdf")
font_small.load_glyphs(b'abcdefghijklmnopqrstuvwxyzABCDEFGHIJKLMNOPQRSTUVWXYZ!.')

# Make a background color fill
color_bitmap = displayio.Bitmap(320, 240, 1)
color_palette = displayio.Palette(1)
color_palette[0] = 0x3399ff
bg_sprite = displayio.TileGrid(color_bitmap, x=0, y=0, pixel_shader=color_palette)
splash.append(bg_sprite)

# Make a shape on it too
roundrect = RoundRect(80, 80, 160, 120, 30, fill=0xFFFFFF, outline=0x7a33ff, stroke=10)
splash.append(roundrect)

# Set up the numbers and the letters for the clock
label_countdown = label.Label(font_large, color=0x0)
label_countdown.x = 110
label_countdown.y = 130
splash.append(label_countdown)
label_ready = label.Label(font_small, color=0xCA33FF)
label_ready.x = 0
label_ready.y = 30
splash.append(label_ready)

# countdown function

def countdowntimer():
    print("30 Second Countdown")
    label_ready.text = "Waiting..."
    x = range(iotimer, -1, -1)
    for t in x:
        print("Time:", t)
        if t > 9:
            label_countdown.text = str(t)
            time.sleep(1)
        else:
            label_countdown.text = "0" + str(t)
            time.sleep(1)
    label_ready.text = "Ready!"

while True:
    touch = ts.touch_point
    if touch:
        try:
            light_value = adc.value
            temperature = adt.temperature
            io.send_data(light_feed['key'], light_value)
            io.send_data(temperature_feed['key'], temperature, precision=2)
            print("Light:", light_value, "Temp:", temperature)
            label_ready.text = "Data Sent"
            time.sleep(.5)
            countdowntimer()
        except (ValueError, RuntimeError, ConnectionError, OSError) as e:
            print("Failed to get data, retrying\n", e)
            label_ready.text = "Error Sending, try again"
            wifi.reset()
            continue